Red Dead Redemption 2
Chapter 1 Colter
Chapter 1 consists of mostly tutorials and the beginning of the story. I only have a few tips for this chapter.
- Starting the second mission Pursued by a Memory you will have your first horse to bond with. As you’re riding it constantly tap L5 (Calm while riding button). This will allow you to bond with your first horse faster. Usually, you can get to Level 3 Bonding by Chapter 2 doing this.
- Practice using Dead Eye even while hunting.
- Loot…Loot…Loot…Start searching and looting everything. This is very important while doing missions because you only get loot and awards on the initial completion. You don’t get to keep what you find during mission replays.
DS4 Windows
I use a PlayStation 4 controller even on PC and sometimes the buttons shown in my videos show Xbox buttons. The button configuration depends on whether I’m using DS4 Windows at that particular time. DS4 Windows is necessary when you need the vibration feature on a PS controller to work for this game. Sometimes I forget to turn it on. Steam used to do the trick, but now it doesn’t and I’m currently using DS4 Windows with Steam. Here’s the link for DS4/DS5 Windows if you need it.
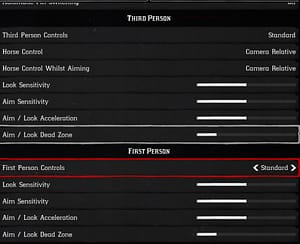
Adjusting Aim Look Sensitivity
One thing that you need to start working on now, and practice is using the flicking technique to get head shots. Once you master it you will be practically unstoppable. Auto-aim puts your sight at the center mass of the target, flick up (left stick) slightly just after auto-aiming will put the sight on the target’s head almost every time. The key to this technique is getting the Look Sensitivity, Aim Sensitivity, and Aim / Look Acceleration in the sweet spot. Some players need it sensitive, some less sensitive. Here’s how you begin to adjust your settings to suit your game play. Adjust in small increments, try it out for an hour or so, and keep adjusting until you find your sweet spot.
• When you flick up and if the sight is too high, lower your settings in small increments.
• When you flick up and if the sight is too low, increase your settings in small increments.
My current settings are shown in the image which is a great starting point. The Third Person Controls, I never use First Person view.
Red Dead Redemption 2 – Chapter 1 Walkthroughs
NOTE: I’ve added the gold task lists for the missions in case you want to practice or try for gold the first try. Remember you have to skip dialogue and cut-scenes to get gold. For all missions that you’re not allowed to take health items that means tonics/food that restore health. You can still use Dead Eye and Stamina tonics.
Introduction – Outlaws from the West

Mission Task List:
There is no timer on this mission so take your time since you cannot take any damage. 80% accuracy is required so don’t shoot unless it’s a good shot. Lastly, loot everything in the house.
• Take no damage during the shootout.
• Loot 6 or more items from Adler Ranch.
• Complete with at least 80% accuracy.
Enter, Pursued by a Memory
Mission Task List:
There is a point where you’ll be prompted to take the shotgun from your horse. Take the Sawed-Off Shotgun (pistol) as well. Killing the wolves without taking damage can be done with the other weapons but I’ve found it easier with the Sawed-Off Shotgun. If you take damage just leap off the cliff and reload the checkpoint. This mission is long and reloading is easier than having to replay everything just to get back to the wolf part. Here you may have to dodge an attack like I did. While aiming press the square button and left stick in the direction you want to dodge.
• Kill all the wolves without taking damage.
• Complete with at least 80% accuracy.
Old Friends

Mission Task List:
Best to go through this one without worrying about gold the first time. There is a lot of looting in this mission. You need 15 head shots in this one so when Dutch asks if you want to take the lead, take the lead to guarantee the first head shot. Practice aim flicking and only aim at heads. Once you take an enemy out, let go of the aim button, when you re-aim the next closest enemy is auto-aimed. Here you practice using Dead Eye as well since you have to take out 3 O’Driscolls in the same Dead Eye, timing is a factor here since you have to get a group of 3 close together. Remember, you can’t take health items but you can take a Dead Eye Tonic if you need more.
• Catch and hogtie Kieran within 45 seconds
• Kill 3 O’Driscolls in the same Dead Eye use.
• Complete within 15 minutes and 30 seconds.
• Get 15 head shots.
• Complete the mission without taking any health items.
The Aftermath of Genesis

Mission Task List:
This one is easy enough as you’re guided through it. Notice the tree where I stop on the left, if you go past that tree, you’ll spook the deer. It takes stamina to draw the bow back and hold so keep an eye on that. Use Dead Eye to help with the clean shot if you need to. You have to hit the deer in the head or neck for it to be a clean shot. If you have trouble, try using the “call” button.
• Kill each deer with one arrow.
• Do not spook either deer.
• Get a clean kill on the second deer.
Who the Hell is Leviticus Cornwall?

Mission Task List:
When Lenny asks, let him take the lead (if you save him). Save your Dead Eye for when there are multiple enemies to conserve it. You have 1 minute and 30 seconds to eliminate the guards, take your time from behind cover, you should have more than enough time if you keep a rhythm. There is no main mission timer so loot all the bodies before moving on. On the train, loot the entire car saving the back cabinet on the right for last. Loot anything you missed on the way back to the train engine car. Once you start the engine the mission will end.
• Save Lenny when he is hanging from the train.
• After stopping the train, take out the guards within 1 minute and 30 seconds.
• Take no damage during the shootout.
• Get 10 head shots.
• Complete the mission.
Eastward Bound

Mission Task List:
For most of this mission your time is determined for you. Change the wagon wheel as fast as you can. When the dialogue finally stops drive the wagon as fast as you can cutting as many corners as you can. You still have plenty of time and shouldn’t be fighting the clock. Lastly, use R1 to stop the wagon as you enter the camp to pick up Javier.
• Pick up Javier when entering Horseshoe Overlook.
• Complete within 6 minutes.
Red Dead Redemption 2 – Chapter 1 Walkthroughs (Gold)
NOTE: I’ve added the gold task lists for the missions in case you want to practice or try for gold the first try. Remember you have to skip dialogue and cut-scenes to get gold. For all missions that you’re not allowed to take health items that means tonics/food that restore health. You can still use Dead Eye and Stamina tonics.
Introduction – Outlaws from the West (Gold)

Mission Task List:
There is no timer on this mission so take your time since you cannot take any damage. 80% accuracy is required so don’t shoot unless it’s a good shot. Lastly, loot everything in the house.
• Take no damage during the shootout.
• Loot 6 or more items from Adler Ranch.
• Complete with at least 80% accuracy.
Enter, Pursued by a Memory (Gold)

Mission Task List:
There is a point where you’ll be prompted to take the shotgun from your horse. Take the Sawed-Off Shotgun (pistol) as well. Killing the wolves without taking damage can be done with the other weapons but I’ve found it easier with the Sawed-Off Shotgun. If you take damage just leap off the cliff and reload the checkpoint. This mission is long and reloading is easier than having to replay everything just to get back to the wolf part. Here you may have to dodge an attack like I did. While aiming press the square button and left stick in the direction you want to dodge.
• Kill all the wolves without taking damage.
• Complete with at least 80% accuracy.
Old Friends (Gold)

Mission Task List:
It’s best to go through this one without worrying about gold the first time. There is a lot of looting in this mission. You need 15 head shots in this one so when Dutch asks if you want to take the lead, take the lead to guarantee the first head shot. Practice aim flicking and only aim at heads. Once you take an enemy out, let go of the aim button, when you re-aim the next closest enemy is auto-aimed. Here you practice using Dead Eye as well since you have to take out 3 O’Driscolls in the same Dead Eye, timing is a factor here since you have to get a group of 3 close together. Remember, you can’t take health items but you can take a Dead Eye Tonic if you need more.
• Catch and hogtie Kieran within 45 seconds
• Kill 3 O’Driscolls in the same Dead Eye use.
• Complete within 15 minutes and 30 seconds.
• Get 15 head shots.
• Complete the mission without taking any health items.
The Aftermath of Genesis (Gold)

Mission Task List:
This one is easy enough as you’re guided through it. Notice the tree where I stop on the left, if you go past that tree, you’ll spook the deer. It takes stamina to draw the bow back and hold so keep an eye on that. Use Dead Eye to help with the clean shot if you need to. You have to hit the deer in the head or neck for it to be a clean shot. If you have trouble, try using the “call” button.
• Kill each deer with one arrow.
• Do not spook either deer.
• Get a clean kill on the second deer.
Who the Hell is Leviticus Cornwall? (Gold)

Mission Task List:
When Lenny asks, let him take the lead (if you save him). Save your Dead Eye for when there are multiple enemies to conserve it. You have 1 minute and 30 seconds to eliminate the guards, take your time from behind cover, you should have more than enough time if you keep a rhythm. There is no main mission timer so loot all the bodies before moving on. On the train, loot the entire car saving the back cabinet on the right for last. Loot anything you missed on the way back to the train engine car. Once you start the engine the mission will end.
• Save Lenny when he is hanging from the train.
• After stopping the train, take out the guards within 1 minute and 30 seconds.
• Take no damage during the shootout.
• Get 10 head shots.
• Complete the mission.
Eastward Bound (Gold)

Mission Task List:
For most of this mission your time is determined for you. Change the wagon wheel as fast as you can. When the dialogue finally stops drive the wagon as fast as you can cutting as many corners as you can. You still have plenty of time and shouldn’t be fighting the clock. Lastly, use R1 to stop the wagon as you enter the camp to pick up Javier.
• Pick up Javier when entering Horseshoe Overlook.
• Complete within 6 minutes.
Proudly powered by WordPress